Live Racks
Max for Live devices
-
Services
- Mastering
- Max for Live development
- Tuition, workshops, consultancy
-
Live Racks
- AD2 Suite
- SD Suite
- Textures
- Channel Strip
-
Max for Live devices
- LivePlayState
- LiveTime
- LFO MIDI
- YouTube Channel
- Blog
- Contact
1
Introduction
Thank you for checking out Textures! In this manual you’ll find everything you need to better understand what’s inside Textures and how to use everything effectively.
Textures is an Audio Effect Rack housing several Resonators devices, along with Reverb, Grain Delays and a Saturator to easily create harmonic and colorful reverbs. Send ANY audio signal through Textures to get a very responsive, harmonic and warm space in your mix.
2
Installation
To start using Textures, unpack the .alp file somewhere in your User Library, or in one of your custom folders in Live’s Browser. Then, depending on the type of scale (minor/major) and chord you’d like to use, drag one of the presets from the Browser onto a Return channel. Afterwards, use the Send knobs on any of the existing channels to feed audio into Textures.
Using Textures on an individial Audio / MIDI / Group channel is also an option, but note that there is no Dry / Wet control.
Updates
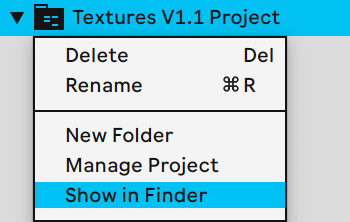
Every now and then SoundSuite’s devices receive updates. To check if you’re still on the latest version, right click Textures’ project folder and click Show in Finder/Explorer. Once the folder is revealed, double click the www-Check For Updates.url file.
Info View and Macros
Hover over any of Textures’ Macros to reveal information about their usage in Live’s Info View.
3
Textures
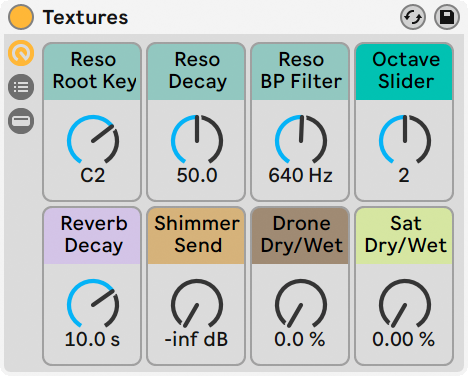
Pick one of the Textures presets, place it on a (Return) channel, and use the Macros in the following order:
- Reso Root Key - Set the Resonators Root Key to the same root key of your track. The chord in the preset’s name is generated on top of this root key.
- Reso Decay - Determine the length of the chord that is generated by the Resonators.
- Reso BP Filter - Each Resonators device has an internal BandPass filter. This Macro controls those filters, enabling you to set the brightness of the generated chord.
- Octave Slider - There are three Resonators devices in Textures, all generating the same chord, but on a different octave. Crossfade between the octaves to get different timbres.
- Reverb Decay - Reverb is applied with 100% wetness. This Macro determines the decay of the reverb. Coincidentally, the further you open the Macro, the darker the reverb becomes.
- Shimmer Sen -d Opening this Macro feeds the signal into a Grain Delay that acts as a Shimmer Delay, meaning that each delay is pitched up 12 semitones (= 1 octave).
- Drone Dry / Wet - The “Drone” is also a Grain Delay, but instead of pitching it up like a Shimmer effect, the delays are pitched down, resulting in a subby rumbling drone sound.
- Sat Dry / Wet - Controls a Saturator. Opening this Macro will increase the Drive, while moving the Output parameter counter-clockwise, to retain the same loudness.
4
What happens inside
The Resonators
Let’s start at the core, which is the Resonators Audio Effect Rack (highlighted in blue in the image below). This rack contains three Chains, each containing a single Resonators device. The settings on the three Resonators devices are almost identical, except for the Root Note, which are set to different octaves, and the Filter Frequency, which is slightly higher in the “Mid” and “High” chains.
Textures itself is an Audio Effect Rack, consisting of several more layers of Audio Effects Racks. The audio passes through racks and chains (although the chains inside the child Racks run in parallel):
Textures (Audio Effect Rack)
- Resonators Shell (Audio Effect Rack)
- Resonators (Auddio Effect Rack)
- Chain 1, Low (one Resonators device)
- Chain 2, Mid (one Resonators device)
- Chain 3, High (one Resonators device)
- Dummy (one bypassed Redux device)
- Resonators (Auddio Effect Rack)
- Audio Effects (Audio Effect Rack)
- Grain Delays (Audio Effect Rack)
- Chain 1, Dry, (No devices)
- Chain 2, Shimmer (one Utility device + one Grain Delay device)
- Chain 3, Drone (one Grain Delay device + one bypassed Utility device)
- Reverb
- Saturator
- Grain Delays (Audio Effect Rack)

As you can see in the image of Textures that is shown on the left, the Reso Root Key Macro shows the root note of the Resonators device on that is located on the “Low” Chain. The same applies to the Reso BP Filter Macro.
Here are some questions and answers that help to better understand how I “programmed” the Macros:
- Why are the Root Note parameters of the different Resonators devices not mapped to the same Macro, but instead mapped to separate Macros?
You can map different parameters to the same Macro, and set individual ranges for each parameter. However, as soon as you set different ranges for the same parameter of different devices, Live does not know which of the different output values it should priotize and display under the Macro, so instead it shows a generic 0-127 numeric value. Such generic numeric values make it hard to understand what a Macro is doing, so I wanted to retain the actual Root Note outputs. - How come the values of the Low chain are displayed in Textures, and not the values of the Mid and High chains instead?
This is where the Shell comes into play. When you map three Macros to a parent Audio Effect Rack Macro, it will display the value of the FIRST Macro in line of the child Audio Effect Rack. Since the output value of Macro 1, the first in line, is C2, this is the value that is displayed in the parent Rack Macro. - What is the purpose of the Dummy device in the Resonators Shell Rack?
In the image below is shown what the Octave Slider does. It is mapped to the Chain Selector, working as a crossfader between the Low, Mid and High octaves. When the Chain Selector is mapped to a Macro, a numeric value between 0-127 is displayed. Since we’re working with three octaves, I wanted to display the numbers 1, 2 and 3 rather than 0-127. In order to achieve this, I had to assign a Macro to a dummy parameter that outputs these three numbers, and make sure that this Macro is first in line BEFORE the Macro that is assigned to the Chain Selector. So the dummy parameter is assigned to Macro 4, and the Chain Selector to Macro 8. When both Macros are then mapped to the same parent Macro (like in the Resonators Shell rack), the value of the dummy parameter is displayed, and not the value of the Chain Selector.

The other audio effects
The signal that comes out of the Resonators first passes through another Audio Effect Rack with Grain Delays, before going through a Reverb and Saturator. Unless the “Shimmer Send” and “Drone Dry/Wet” Macros of Textures are opened, the output of the Resonators goes straight to the Reverb and Saturator.

Grain delays
The Grain Delays Audio Effect Rack consists of three Chains, of which the first is the Dry, which has no effects on it. The second chain is Shimmer, which houses a Utility device of which the Gain parameter serves as a Send, controlling how much of the Dry signal is being fed into the Grain Delay. The “Shimmer Send” Macro of Textures is mapped to this Gain parameter.

The Drone Chain can only be heard when moving the Chain Selector, which is controlled by the “Drone Dry/Wet” Macro in Textures. Similarly to the Resonators Audio Effect Rack, the Chain Selector would in this case make more sense if it doesn’t display a generic numeric value, but rather a percentage like any other Dry/Wet knob. For that reason a Utility device was used to get ahold of a dummy parameter that outputs a percentage (the Width parameter). The dummy parameter was assigned to Macro 5, before Macro 7, so it outputs a percentage to the parent Macro of the “Audio Effects” Audio Effect Rack, and in turn; Textures.

Reverb
Once the signal has passed through the Grain Delays Audio Effect Rack, it reaches the Reverb. The Dry/Wet is set to 100%, and the only parameters that are affected by the “Reverb Decay” Macro in Textures is the Decay Time and the Frequency of the Input Processing LP Filter. The result is that the longer the decay, the darker the reverb will sound.
Saturator
Finally the audio signal goes through a Saturator. The Drive and Output parameters have both been mapped to the same Macro, to make sure the Output lowers when the Drive increases, keeping the signal at the same loudness and only adding distortion, rather than making the signal louder. The Dry/Wet parameter of the Saturator is mapped to Macro 4, whereas the Drive and Output parameters are mapped to Macro 8. This is done for the following two reasons:
- It keeps the signal clean of any distortion at 0%, meaning that any coloring of sound is completely optional.
- Giving a relevant output value (a percentage) for the parent Macro in Textures.
5
Changelog
V1.1 (October 3, 2019)
- Repackaged download file format to Ableton Live Pack (.alp). The new file contains all Textures preset files, a demo project and URL files that lead to the online Manual, Changelog and Update Checker.
- Added info texts to all of Textures’ Macros. Hover over the Macros to read info about them in the Info View.
- Updated the online manual’s Installation chapter in regard to the new changes.
V1.0 (March 28, 2018)

About SoundSuite
SoundSuite creates tools, videos and lessons about anything involving electronic music production, Ableton Live and Push. SoundSuite is run by Jean-Paul Grobben, an Ableton Certified Trainer based in Amsterdam, Netherlands.
Contact Details
Comeniusstraat 225hs
1065BN, Amsterdam
The Netherlands
Mail@SoundSuite.nl
KVK 53753100